WooCommerce Order API Integration — Send Order Data to Any REST API
WooCommerce order API integration is the core feature of AnyAPI. It lets you automatically send order data to any external REST API whenever an order reaches a specific status — no coding required. In this guide, you will learn how to create an integration from start to finish using the step-by-step wizard.
How WooCommerce Order API Integration Works
Before diving into the setup, here is a quick overview of how the process works:
- First, a customer places an order in your WooCommerce store.
- Then, the order reaches a status you have configured (for example, “Processing”).
- Next, AnyAPI detects the status change and fires the trigger you selected.
- After that, the plugin builds the payload using the filter mode you chose (Basic, Advanced, or Expert).
- Then, AnyAPI sends an HTTP request to your configured endpoint with the order data.
- Finally, the result is recorded in API Logs so you can verify the call.
In other words, your WooCommerce order API integration runs automatically in the background every time an order matches your trigger condition.
Step 1: Create a WooCommerce Order API Integration
To start, navigate to AnyAPI → Order API in your WordPress dashboard. Then, click the + New Integration button to open the setup wizard.
In the first step, fill in the following fields:
Integration Name — First, give your integration a descriptive label so you can identify it later. For example, “Slack New Order Alert” or “CRM Order Sync.”
API Endpoint URL — Next, enter the full URL of the external API you want to send data to. This is the destination for your WooCommerce order API integration.
HTTP Method — By default, the method is set to POST, which works for most APIs. Other methods (GET, PUT, PATCH, DELETE) are available if your endpoint requires them.
API Key — Additionally, select an API key from the dropdown if your endpoint requires authentication (Basic Auth or Bearer Token). If your endpoint does not need a key — for example, a Slack Incoming Webhook URL — leave this field empty. To learn how to create API keys, see API Key Management.
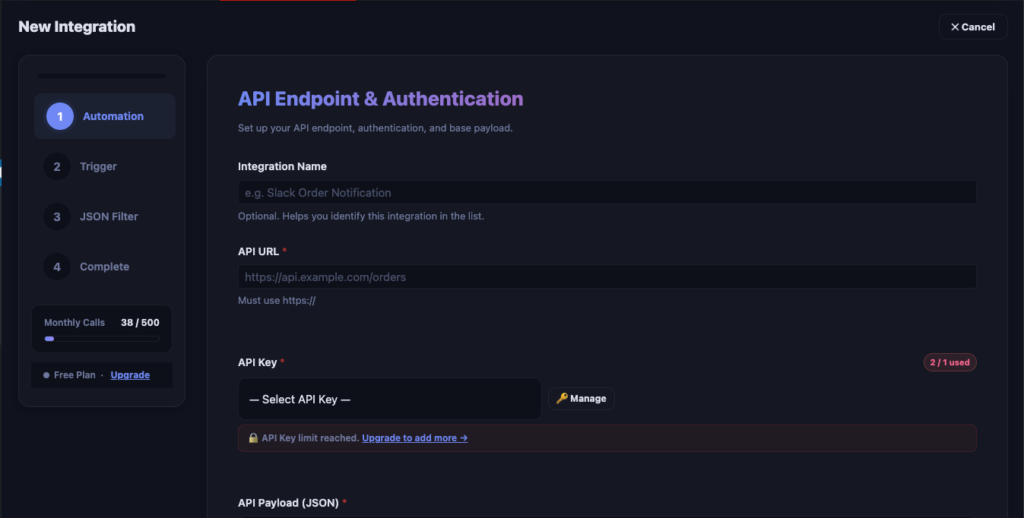
Once you have filled in the fields, click Next to continue.
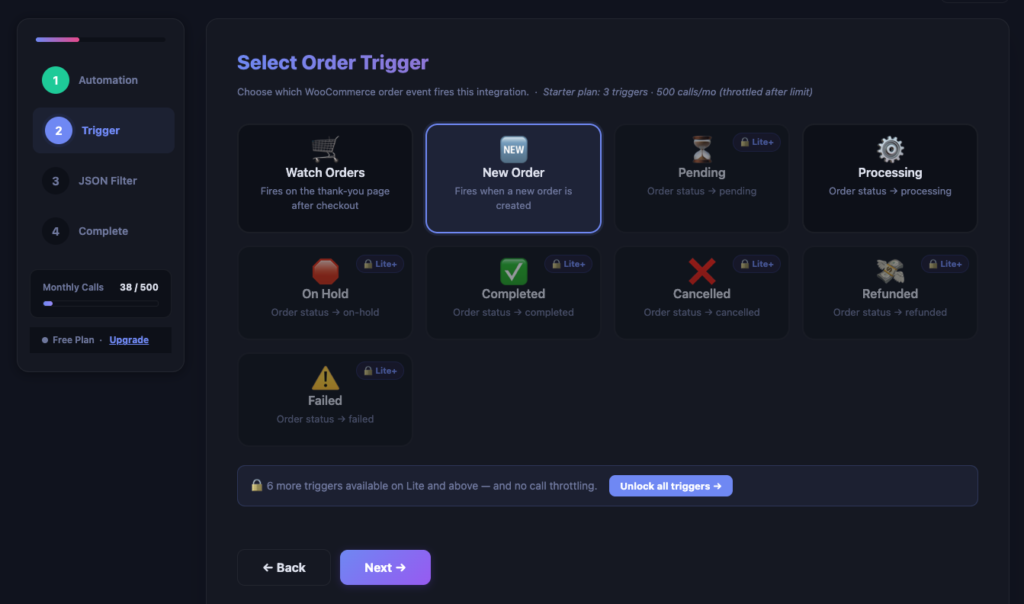
Step 2: Choose a WooCommerce Order API Trigger
Next, select the order event that should fire your WooCommerce order API integration. AnyAPI supports nine triggers, each mapped to a WooCommerce order status:
| Trigger | Fires When | Plan |
|---|---|---|
| Watch Orders | Any status change | Starter |
| New Order | Order created (pending) | Starter |
| Processing | Order moves to processing | Starter |
| On Hold | Order moves to on-hold | Lite+ |
| Completed | Order moves to completed | Lite+ |
| Cancelled | Order is cancelled | Lite+ |
| Refunded | Order is refunded | Lite+ |
| Failed | Payment fails | Lite+ |
| Pending | Order set to pending (alias) | Lite+ |
On the Starter (free) plan, three triggers are available: Watch Orders, New Order, and Processing. In contrast, the remaining six triggers are unlocked on the Lite plan and above. If you click a locked trigger, an upgrade prompt will appear.
Tip: “Watch Orders” fires on every status change. As a result, this is useful if you want a single integration to capture all order activity. However, for most use cases, choose a specific status like “Processing” or “Completed” to avoid duplicate API calls.
After that, click the trigger tile to select it, then click Next.
Step 3: Configure Your Payload Filter
This step controls which order data is included in the API request. AnyAPI offers three filter modes for your WooCommerce order API integration. Choose the one that matches your needs.
Basic Filter Mode (All Plans)
Basic mode is the simplest option. Essentially, AnyAPI sends the full order data object as the payload. Therefore, there is nothing to configure — the plugin handles everything automatically.
Specifically, Basic mode includes all order fields: order ID, status, totals, billing and shipping addresses, line items, tax lines, shipping lines, fee lines, coupon lines, and metadata.
In particular, this mode works well for endpoints that accept a complete WooCommerce order object, or when you want to send everything and let the receiving system decide what to use.
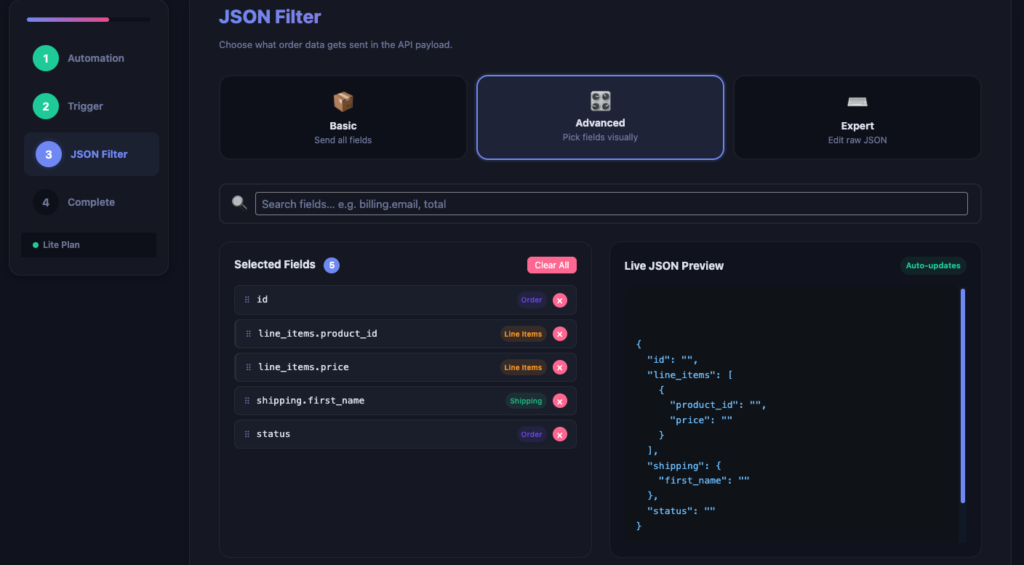
Advanced Filter Mode (Lite Plan and Above)
In contrast, Advanced mode lets you pick exactly which fields to include in the payload. Instead of sending the entire order object, you select individual fields from a checkbox list.
To configure Advanced mode:
- First, click the Advanced filter mode button.
- Then, browse the available field categories: Order, Billing, Shipping, Meta Data, Line Items, Tax Lines, Shipping Lines, Fee Lines, and Coupon Lines.
- Next, tick the checkboxes for the fields you need.
- Finally, drag the selected fields to reorder them if your API expects a specific field sequence.
For example, if your CRM only needs the order ID, customer email, and total amount, select just those three fields. As a result, your payload stays clean and lightweight.
Expert Filter Mode (Lite Plan and Above)
Similarly, Expert mode gives you full control over the JSON payload. Instead of using the field selector, you write raw JSON directly in a text editor. In particular, this is useful when your API requires a specific payload structure that does not match the default WooCommerce order format.
In Expert mode, you can use template variables like {{order_id}} and {{billing_email}} to insert order data into your custom JSON structure. For a complete list of available variables and examples, see the JSON Filter Mode documentation.
Note: If the JSON you enter is not valid, the wizard will show an error and prevent you from continuing. Furthermore, Expert mode is only available on the Lite plan and above.
Step 4: Review and Save
After configuring your filter, click Next to reach the summary screen. At this point, you can review all the details of your WooCommerce order API integration before saving:
- Integration name
- API endpoint URL and HTTP method
- Selected API key (if any)
- Trigger event
- Filter mode and selected fields
If everything looks correct, click Save Integration. As a result, AnyAPI will store your configuration and begin listening for the trigger event immediately.
Alternatively, to go back and change anything, click the step indicators at the top of the wizard to navigate to a previous step.
Testing Your WooCommerce Order API Integration
After saving your integration, create a test order to verify that data flows correctly. Specifically, the simplest way to test is with webhook.site, a free tool that captures incoming HTTP requests.
Follow the Quick Start: Webhook Test guide for a step-by-step walkthrough. In short, the process is:
- First, copy a unique URL from webhook.site.
- Then, paste it as your API endpoint URL.
- Next, place a test order in WooCommerce and change its status to match your trigger.
- Finally, check webhook.site to see the received payload.
Once you confirm data is arriving correctly, afterwards replace the test URL with your real API endpoint.
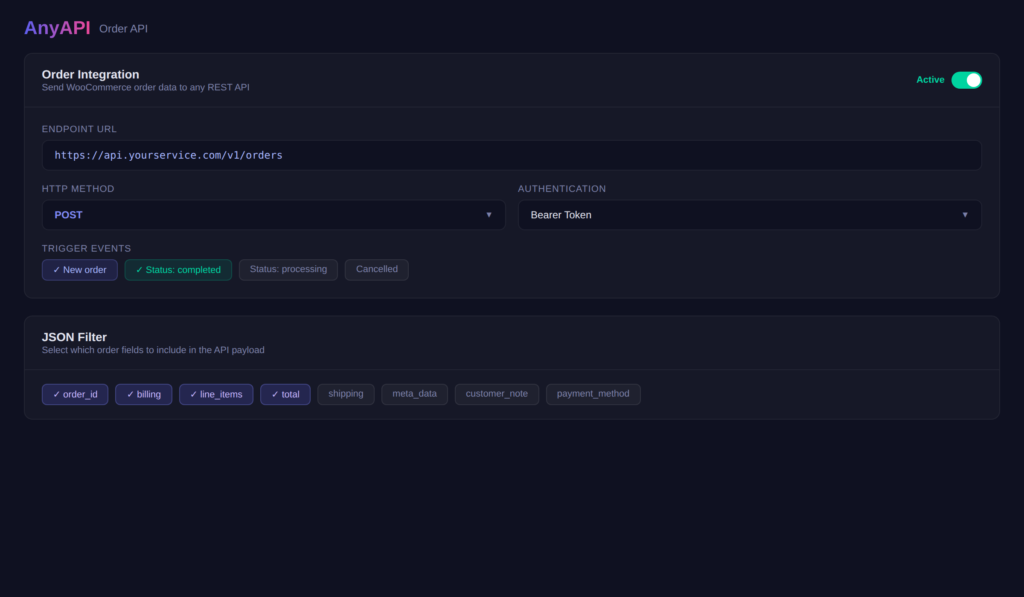
Managing Your Integrations
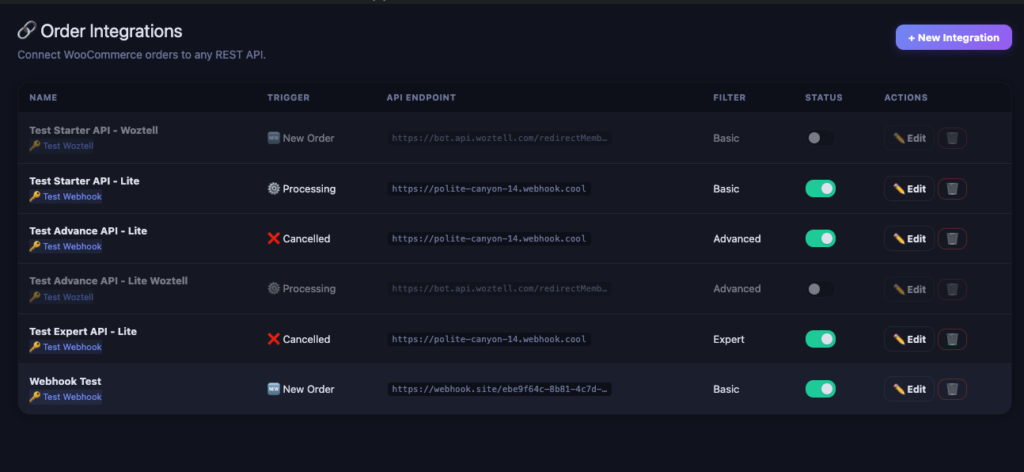
All saved integrations appear on the AnyAPI → Order API page. From here, you can manage each WooCommerce order API integration:
Edit — To modify an integration, click the integration name or the edit icon to reopen the wizard with all fields pre-filled. Then, make your changes and save again.
Enable / Disable — Alternatively, toggle the status switch to temporarily pause an integration without deleting it. As a result, disabled integrations will not fire when orders change status.
Delete — Finally, click the delete icon to permanently remove an integration. Note that this action cannot be undone.
Troubleshooting
If your WooCommerce order API integration is not working as expected, first check the API Logs page. Here are the most common issues:
| Symptom | Likely Cause | Solution |
|---|---|---|
| No log entry appears | Trigger does not match the order status change | Verify you selected the correct trigger for the status transition |
| HTTP 401 or 403 | Invalid or missing API credentials | Check your API key in API Key Management |
| HTTP 400 | Malformed payload or missing required fields | Switch to Advanced or Expert mode to send only the fields your API expects |
| HTTP 404 | Wrong endpoint URL | Double-check the URL for typos or trailing slashes |
| HTTP 500 | Server error on the receiving end | Contact the external service — this is not an AnyAPI issue. Also check the WooCommerce REST API documentation for endpoint requirements |
| “Monthly call limit reached” | Starter plan 500 calls/month cap | Upgrade to Lite for unlimited calls, or wait until next month |
For detailed log analysis, see API Logs & Troubleshooting.
Next Steps
Now that your WooCommerce order API integration is set up, explore these related resources:
- API Logs & Troubleshooting — Monitor outgoing API calls and debug errors.
- JSON Filter Mode — Learn Expert mode in detail, including the full
{{variable}}reference table. - API Key Management — Create and manage Basic Auth and Bearer Token credentials.
- Feature Comparison — See what each plan includes.
- Quick Start: Webhook Test — Test your integration with webhook.site in 5 minutes.