This guide walks you through Slack notification setup for new WooCommerce orders in under 5 minutes. First, you create a Slack Incoming Webhook. Then, you connect it to AnyAPI through a quick 4-step wizard. Best of all, the entire flow runs on the free Starter plan — no code, no Zapier, no monthly fees.
By the end, your team will see a Slack message every time a customer places an order.
Prerequisites
To begin, make sure you have the following ready:
- First, a Slack workspace where you have permission to install apps
- Second, AnyAPI installed and activated on your WooCommerce site (the free Starter plan is enough)
- Third, at least one test order in your WooCommerce store, or the ability to place one
Step 1: Create a Slack Incoming Webhook
First, open your Slack workspace and create a new Incoming Webhook for the channel where you want notifications.
To start, visit the Slack Incoming Webhooks page and click Create your Slack app. Then, pick From scratch, name the app (for example, WooCommerce Orders), and select your workspace.
Next, in the app settings sidebar, click Incoming Webhooks and toggle the feature on. After that, click Add New Webhook to Workspace at the bottom of the page.
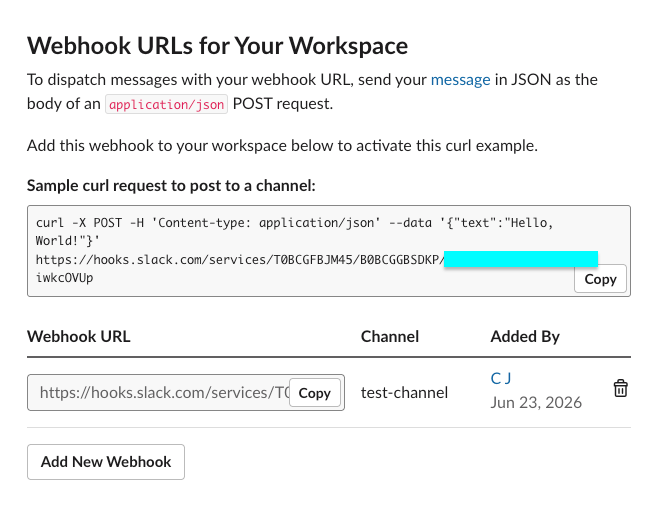
Finally, choose the target channel and click Allow. Slack then generates a webhook URL that looks like this:
https://hooks.slack.com/services/T00000000/B00000000/XXXXXXXXXXXXXXXXXXXXXXXXCopy this URL. You will paste it into AnyAPI in Step 3.
Step 2: Add an API Key for the Slack Notification Setup
Slack Incoming Webhooks need no authentication — the webhook URL itself acts as the credential. However, the AnyAPI wizard treats the API Key field as required, so you must add a placeholder entry before continuing.
In your WordPress admin, open AnyAPI → API Keys and click Add New Key. Then, fill in the following:
- First, Name:
Slack Placeholder(or anything memorable) - Second, Type:
Bearer Token - Third, Token: any non-empty value, for example
unused
After that, click Save. AnyAPI stores the placeholder for use in the next step.
Note that Slack ignores any Authorization header AnyAPI sends, because Slack Incoming Webhooks authenticate purely through the URL. As a result, the placeholder value never reaches a real authentication check on Slack’s side.
For full details on key types, see API Key Management.
Step 3: Configure the Slack Notification Setup in AnyAPI
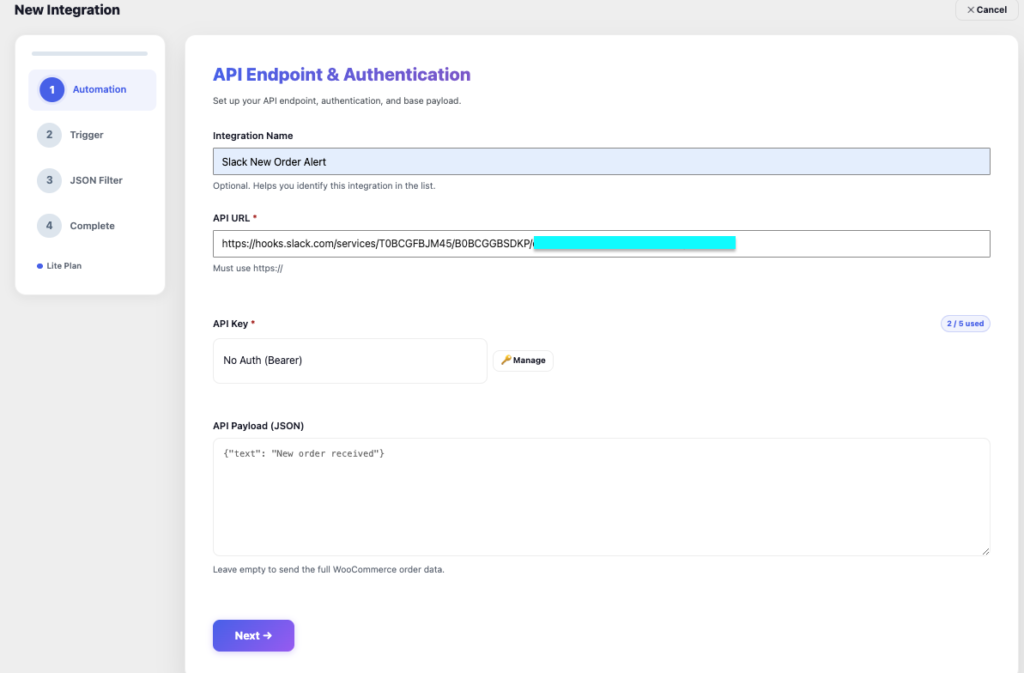
Next, open AnyAPI → Order API and click Add New Integration. The wizard opens on the Automation step, where you set the endpoint, authentication, and payload.
In this step, fill in the following:
- First, set the Integration Name to something memorable like Slack New Order Alert
- Second, paste the Slack webhook URL into the API URL field
- Third, select the placeholder key you just created from the API Key dropdown
- Finally, paste this static JSON into the API Payload field:
json
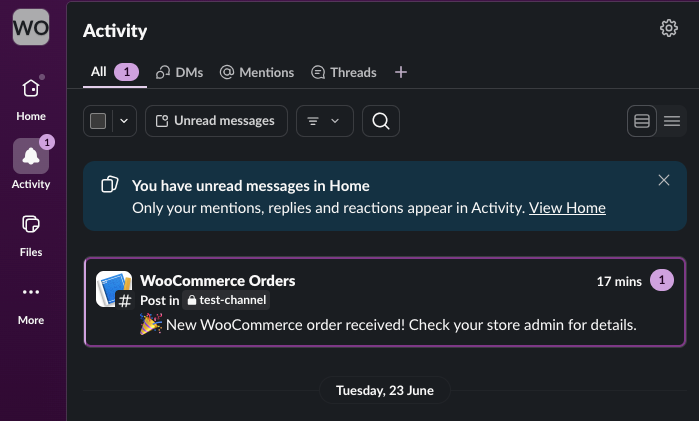
{"text": "🎉 New WooCommerce order received! Check your store admin for details."}In particular, note that this message is static on the free Starter plan. Every order produces the same notification text. Consequently, you get a reliable signal that an order arrived, but the message itself carries no order-specific details. The “Going Further” section below shows how to add dynamic order data on the Lite plan.
After you’ve filled all four fields, click Next.

Step 4: Select the New Order Trigger
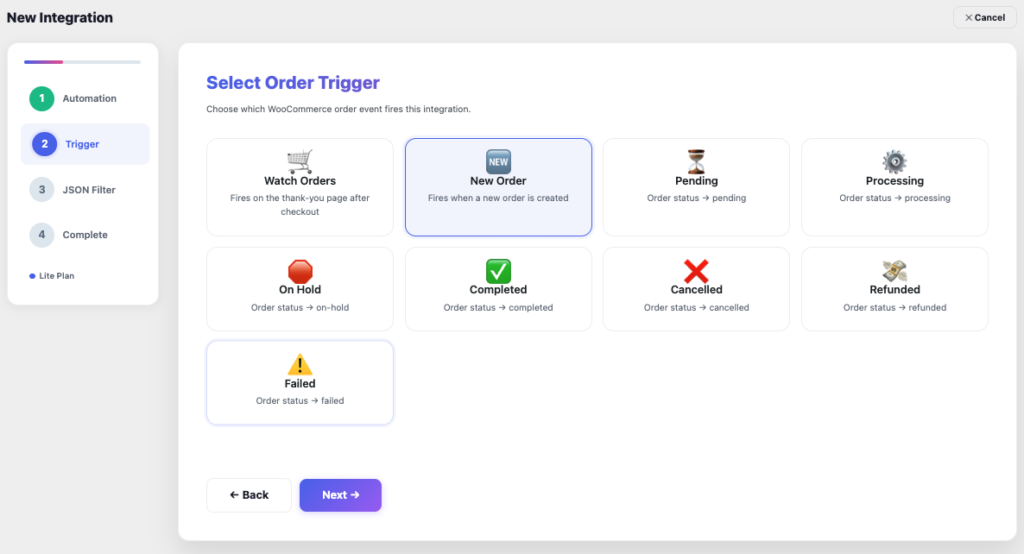
In the Trigger step, AnyAPI displays nine WooCommerce order events as cards. For this Slack notification setup, click the New Order card. As a result, AnyAPI will fire the webhook every time WooCommerce creates a new order.
Note that the free Starter plan supports three triggers: Watch Orders, New Order, and Processing. The remaining six triggers (Pending, On Hold, Completed, Cancelled, Refunded, Failed) require the Lite plan.
After that, click Next to move to the JSON Filter step.
Step 5: Confirm Basic Filter Mode
In the JSON Filter step, leave Basic selected. This is the default and the only mode available on Starter. The info box on this screen confirms how the Step 1 payload behaves:
Leave the Step 1 payload empty to forward the full WooCommerce order object. Enter a static JSON there to send exactly that instead.
{{variable}}placeholders are not interpolated in Basic mode.
Because you pasted a static JSON in Step 3, AnyAPI sends exactly that JSON to Slack. It will not forward the full WooCommerce order object. This is the behavior Slack needs.
Finally, click Review to move to the last step.
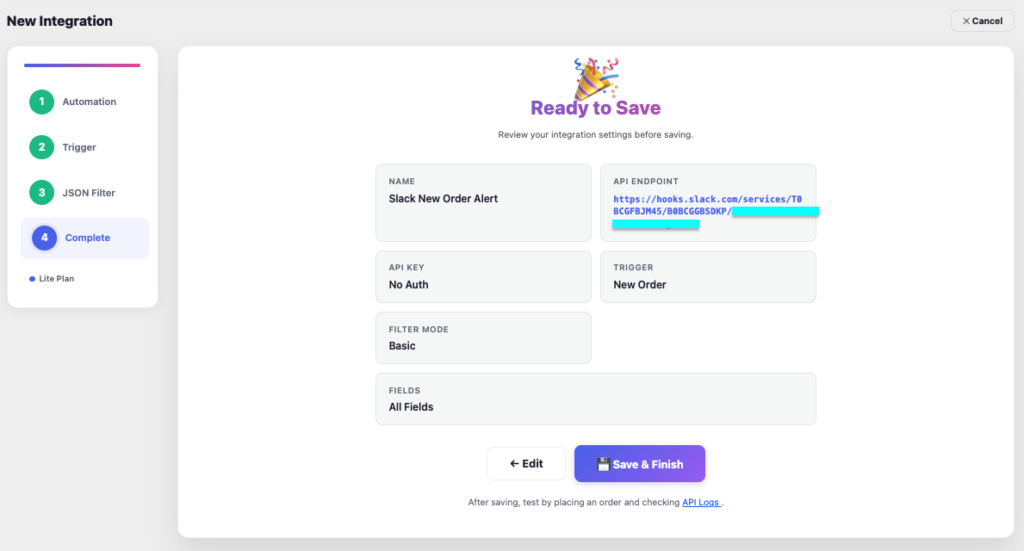
Step 6: Review, Save, and Test the Slack Notification Setup
The Complete step shows a summary of every setting. Verify that:
- First, the API Endpoint matches your Slack webhook URL
- Second, the Trigger shows New Order
- Third, the Filter Mode shows Basic
Then, click Save & Finish. AnyAPI activates the integration and starts listening for new orders.
To test the setup, place a test order in your WooCommerce store. After checkout completes, switch to your Slack channel within a few seconds. You should see the notification message appear.
In addition, you can open AnyAPI → API Logs to confirm AnyAPI sent the request and Slack responded with HTTP 200.
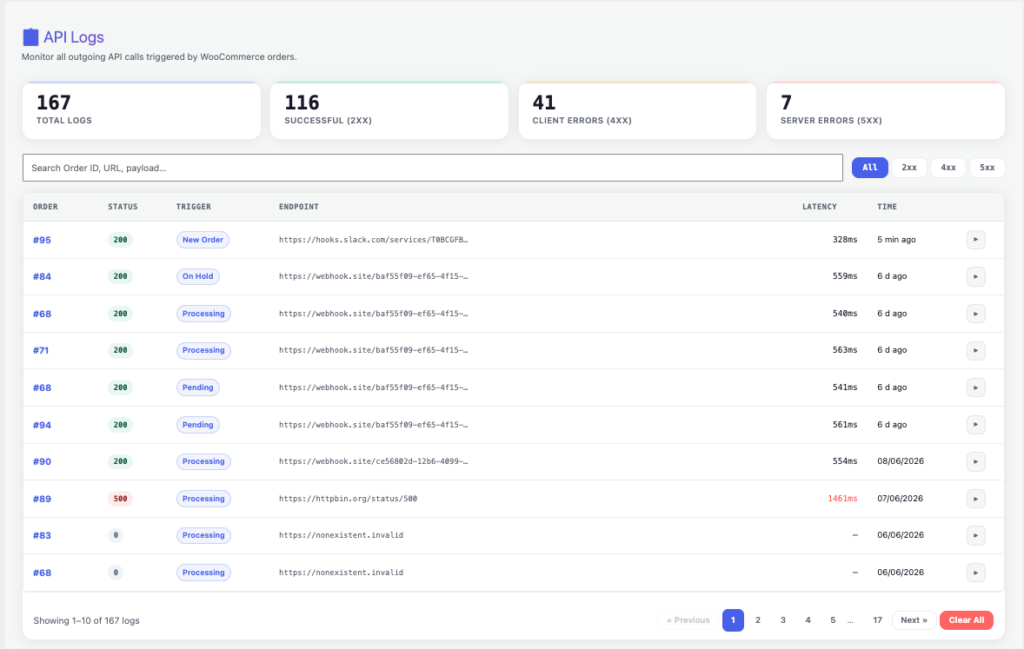
For deeper inspection, see the API Logs & Troubleshooting guide.
Going Further: Dynamic Order Variables (Lite)
Of course, a static message is a starting point. Most teams want each Slack notification to show the order number, customer name, and total.
On the Lite plan, the Expert filter mode in Step 5 unlocks {{variable}} placeholders. For instance, you can write:
json
{
  "text": "New order #{{order_id}} from {{billing_first_name}} {{billing_last_name}} — Total: {{order_total}} {{order_currency}}"
}
As a result, Slack receives a fully personalized message for every order. Furthermore, Lite unlocks the Advanced filter mode (pick fields visually) and all nine triggers. For the full variable list and filter modes, see JSON Filter Mode.
Troubleshooting
In practice, most Slack notification setup issues fall into four categories:
- HTTP 400 —
invalid_payload: First, check that your payload contains atextkey. Slack rejects any payload without it. In this case, the static JSON in Step 3 is the safe baseline. - HTTP 400 —
no_text: This means the payload reached Slack but thetextkey was empty. Next, verify the JSON you pasted in Step 3 has a non-empty string value. - HTTP 404 —
no_service: This usually means the webhook URL is wrong or you removed the app from Slack. After that, regenerate the webhook in Slack and update the API URL field in AnyAPI. - HTTP 200 but no message in Slack: In this case, verify the webhook posts to the correct channel. Sometimes a test webhook targets a private channel you forgot about.
For any other HTTP response, open AnyAPI → API Logs and inspect the response body. The log entry includes the exact error returned by Slack, which usually points straight to the fix.
Next Steps
You now have a working Slack notification setup for WooCommerce. From here, you might want to:
- First, explore the full Order API Integration guide to learn every option in the 4-step wizard
- Second, upgrade to the Lite plan to unlock dynamic
{{variable}}placeholders and all nine triggers - Finally, send the same order data to other tools like Google Sheets or WhatsApp by adding more integrations
Above all, the Starter plan stays free forever. You can run as many tests as you like before deciding whether the Lite plan fits your workflow.