
Testing the WooCommerce REST API usually means juggling external tools like Postman or Insomnia. However, AnyAPI puts a full REST API tester right inside your WordPress dashboard. As a result, you can send requests to any WooCommerce REST API endpoint and read the JSON response without ever leaving your admin area.
In this guide, you will learn what the WooCommerce REST API is, which endpoints you can call, and how to test them step by step. Moreover, you will see how testing connects directly to building a real WooCommerce JSON integration.
What Is the WooCommerce REST API?
The WooCommerce REST API is a standard interface that lets external applications read and write your store data over HTTP. Specifically, it exposes your orders, products, customers, and system data as structured JSON. Therefore, any service that speaks REST — a CRM, an ERP, a messaging app, or a custom script — can connect to your store through it.
In practice, developers use it for two main jobs. First, they test endpoints to confirm that data is available and correctly structured. Second, they build automations that send that data to other platforms. Consequently, a reliable testing step is the foundation of every successful integration.
Common WooCommerce REST API Endpoints
Before you test, it helps to know the most common WooCommerce REST API endpoints. For convenience, the AnyAPI tester includes a Quick Pick row that loads each one with a single click.
| Quick Pick | Method | Endpoint | Purpose |
|---|---|---|---|
| List Orders | GET | /wp-json/wc/v3/orders | Retrieve all orders |
| Get Order | GET | /wp-json/wc/v3/orders/{id} | Retrieve one order by ID |
| List Products | GET | /wp-json/wc/v3/products | Retrieve all products |
| Get Product | GET | /wp-json/wc/v3/products/{id} | Retrieve one product by ID |
| List Customers | GET | /wp-json/wc/v3/customers | Retrieve all customers |
| System Status | GET | /wp-json/wc/v3/system_status | Check store health |
| Create Order | POST | /wp-json/wc/v3/orders | Create a new order |
| Update Order | PUT | /wp-json/wc/v3/orders/{id} | Update an existing order |
As you can see, these endpoints clearly cover the data most stores need. Additionally, you can type any other endpoint manually if your use case requires it. In addition, you can type any other endpoint manually if your use case requires it.
How to Test WooCommerce REST API Endpoints in AnyAPI
Now, let us walk through WooCommerce API testing step by step. First, open AnyAPI → REST API Tester in your WordPress dashboard. Then, follow these steps.
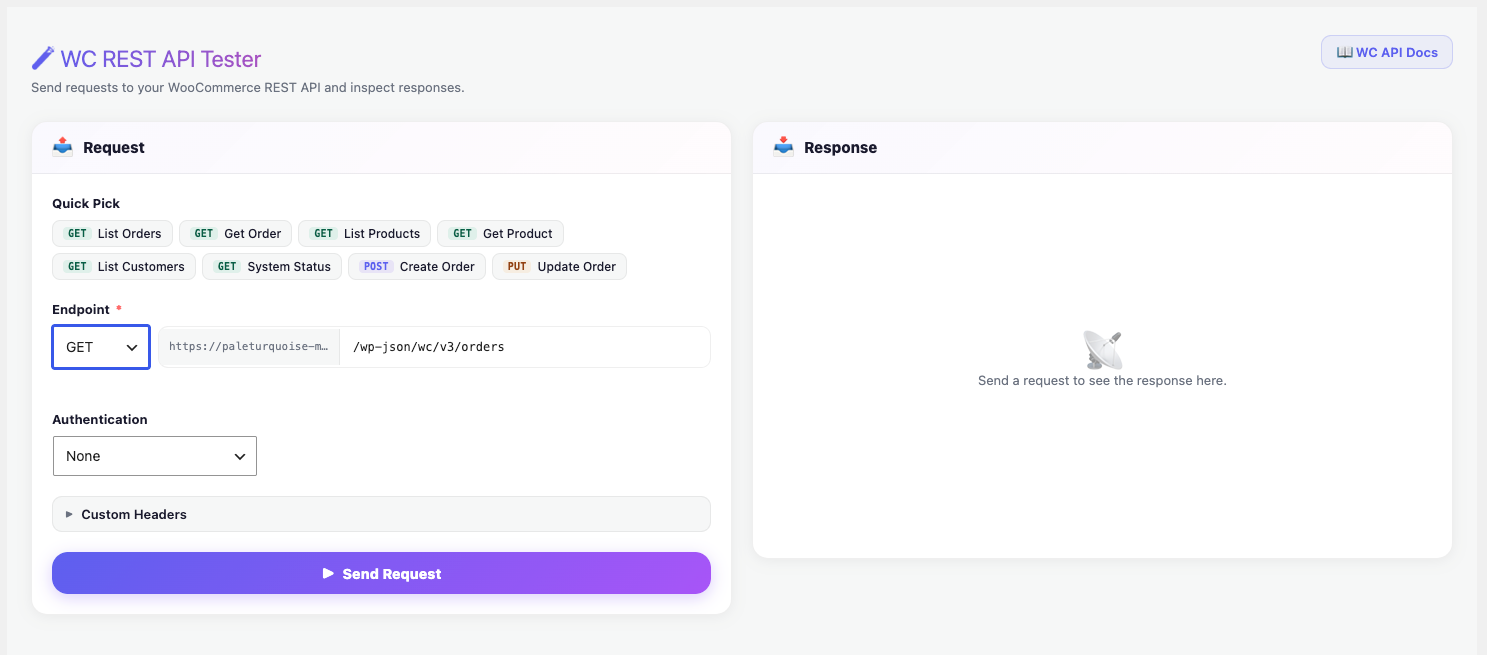
Step 1: Choose Your Method and Endpoint
First, select an HTTP method from the dropdown — for example, GET to read data, POST to create a resource, or PUT to update one. Next, either click a Quick Pick button or type your WooCommerce REST API endpoint into the URL field, such as /wp-json/wc/v3/orders.
Step 2: Add Authentication
After that, choose your authentication method. For public endpoints, you can leave it set to None. However, most WooCommerce REST API endpoints require credentials. Therefore, select Basic Auth or Bearer Token and apply the API key you configured earlier.
Step 3: Add Headers or a Request Body (Optional)
In some cases, your request needs extra headers. For those situations, expand the Custom Headers panel and add them. Furthermore, for POST and PUT requests, enter the required JSON payload in the request body editor.
Step 4: Send the Request
Finally, click Send Request. Within a moment, AnyAPI displays the result in the Response panel on the right.
Reading the JSON Response
Once the request completes, the Response panel immediately shows two key pieces of information. Notably, both pieces help you verify your data. First, the status code confirms success or failure — for instance, 200 OK means success, while 404 Not Found means the endpoint or resource was wrong. Second, the response body shows the JSON data that the WooCommerce REST API returned.
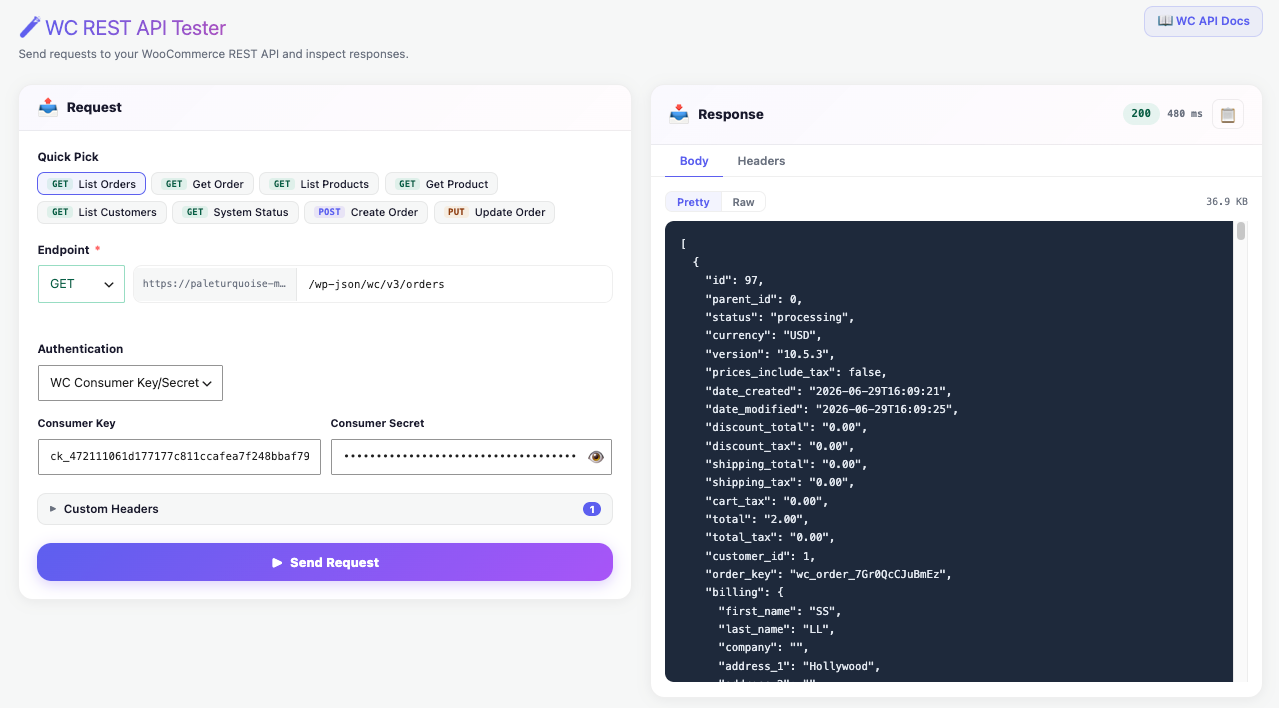
This JSON output matters because it reveals the exact structure of your store data. As a result, you know precisely which fields are available before you build anything. In other words, testing first saves you from guessing field names later.
From Testing to WooCommerce JSON Integration
Testing answers one question: does the endpoint return the data I need? Once you confirm that, the next step is a real WooCommerce JSON integration. In short, you move from reading data manually to sending it automatically.
For example, after you verify the orders endpoint, you can build an integration that pushes every new order to a CRM, a Slack channel, or an ERP. To do that, follow the Order API Integration guide, which uses the same JSON structure you just tested. Consequently, your WooCommerce JSON integration sends only clean, verified fields.
For instance, our WooCommerce Slack notification guide walks through the Slack channel example end to end.
Troubleshooting WooCommerce REST API Calls
Even with the right setup, requests sometimes fail. Fortunately, the status code tells you why. Below are the most common results.
- First, a 401 Unauthorized means your authentication is missing or incorrect. Therefore, check your API key and method.
- Second, a 404 Not Found means the endpoint path is wrong. As a result, verify the URL and resource ID.
- Third, a 400 Bad Request usually means your JSON body is malformed. Consequently, validate the payload before resending.
For automatic integrations rather than manual tests, you should review delivery results in the logs instead. To learn more, read the API Logs and Troubleshooting guide.
Start Building Your WooCommerce REST API Integration
In summary, the AnyAPI tester gives you a fast, built-in way to test the WooCommerce REST API without external tools. First, you pick an endpoint. Next, you authenticate and send the request. Finally, you read the JSON response and move straight into a real integration.
To begin, explore how the whole flow works on the How It Works page. Alternatively, you can consult the official WooCommerce REST API documentation for the complete endpoint reference.