
So you just purchased AnyAPI Lite — congratulations! Before your new features unlock, you need to activate your AnyAPI license on your WordPress site. This guide walks you through the entire process, from downloading the plugin to confirming your license shows as Active. Best of all, the whole flow takes less than five minutes, and you won’t need to write any code.
Before You Begin
First, make sure you have the following ready:
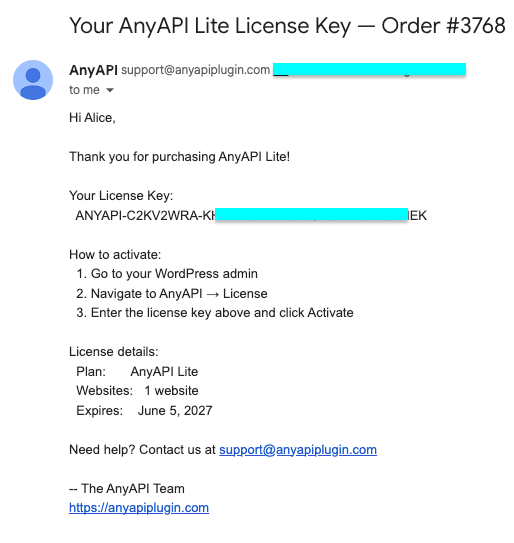
- First, your license key from the AnyAPI license key email (it looks like
ANYAPI-XXXXXXXX-XXXXXXXX-XXXXXXXX-XXXXXXXX) - Second, admin access to your WordPress site
- Third, the free AnyAPI Starter plugin already installed (Lite runs alongside it, not instead of it)
Important: your license key is not the same as an API key for Slack, Google Sheets, or any other service. Because these two credentials look similar at first glance, pasting your license key into the wrong field is the single most common activation mistake. The steps below show you exactly where each one goes.
Step 1: Get the AnyAPI Lite Plugin File
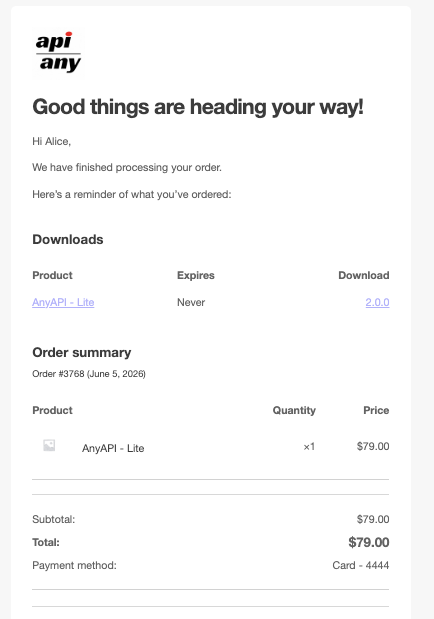
To start, check your inbox for two separate emails after checkout. The first is your WooCommerce order confirmation email — this one has a Downloads section with a direct link to the AnyAPI Lite plugin zip file. The second is a license key email from AnyAPI with your license key and activation instructions; you’ll need that one in Step 3.
If you can’t find the order confirmation email, or the download link doesn’t work, reply to either email or contact support@anyapiplugin.com and we’ll send you the zip file directly.
Note that Lite is a separate zip file from the free Starter plugin on WordPress.org. In other words, installing Lite does not replace anything — it adds new capabilities on top of what Starter already gives you.
Step 2: Install and Activate the Plugin File
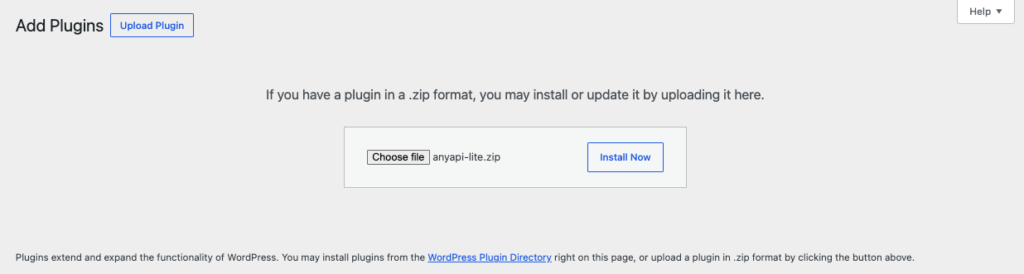
Next, go to Plugins → Add New → Upload Plugin in your WordPress dashboard. Then, choose the zip file you just downloaded and click Install Now.
Once the install finishes, click Activate Plugin. At this point, AnyAPI Lite is running on your site, but you haven’t connected your license yet — that’s the next step, where you’ll activate your AnyAPI license using the key from your confirmation email.
Step 3: Activate Your AnyAPI License
This is the step where most activation issues happen, so pay close attention here. After activating the plugin, go to AnyAPI → License in your WordPress sidebar. This dedicated License page only appears once you install and activate Lite, which is why Step 2 has to come first.
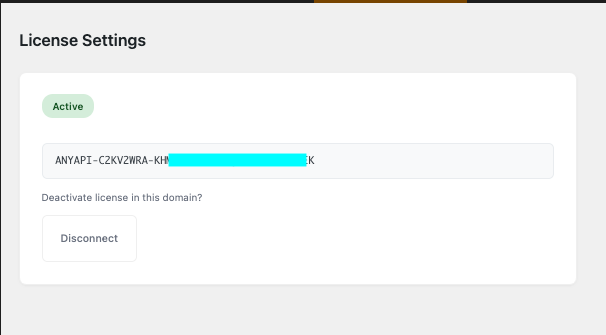
Paste your license key into the License Key field, then click Activate. As a result, the page refreshes and shows a green Active status along with your plan tier and renewal date.
However, if you don’t see the License submenu at all, your Lite plugin likely isn’t active yet. Go back to Step 2 and confirm the plugin shows as active under Plugins.
Confirm You’ve Activated Your AnyAPI License
Once activation succeeds, a quick way to confirm you’ve activated your AnyAPI license correctly is to check that your locked Lite features — advanced JSON filtering, additional order triggers, and the full API log dashboard — no longer show upgrade prompts. If they still appear locked, clear your site’s cache first, since cached admin pages sometimes show stale data for a few minutes.
Troubleshooting Common Activation Problems
“I pasted my key into the API Key field instead.” This is an easy mix-up because both fields accept a similar-looking string. Your license key only belongs on the AnyAPI → License page from Step 3. The API Key field, by contrast, is for connecting to external services like Slack or your ERP system — it has nothing to do with your AnyAPI license.
“I can’t log in to my account portal.” If you checked out as a guest, you may not have portal login set up yet. Reply to your purchase confirmation email, and we’ll sort out your account access directly.
“My license shows as inactive after a few days.” Licenses occasionally need a manual refresh. Deactivate and reactivate the Lite plugin once, and it re-checks your license status automatically.
“I don’t have a license key yet.” If you’re still deciding, take a look at the AnyAPI pricing page to compare Starter and Lite, or read the Feature Comparison guide for a full breakdown.
After You Activate Your AnyAPI License
Once you activate your AnyAPI license, you’re ready to build your first integration. To begin, head over to the Order API Integration guide to connect WooCommerce orders to any external API. Alternatively, if you specifically need Slack or Google Sheets, the API Key Management guide explains how those external credentials work.
If you ever need a refresher on installing plugin zip files in general, the official WordPress.org guide to installing plugins covers the upload process in more detail.
FAQ
Does activating my license cost anything extra? No. Activation itself is free — you’re simply unlocking the features included in the plan you already purchased.
Can I use the same license key on more than one site? This depends on your plan’s activation limit. If you try to activate on an additional domain past that limit, the License page will let you know.
What happens if my license expires? Your site automatically falls back to Starter features. In other words, nothing breaks — you simply lose access to Lite-only capabilities until you renew.
More Questions About Activating Your License
Do I need to reinstall Starter first? No. Starter and Lite work together, so if Starter is already installed and active, you’re all set to move straight to Step 1.
Is there a faster way to activate multiple sites? Not currently. Each site needs its own activation through the License page described above, so repeat Steps 2 and 3 on every domain you plan to use.